Good news for anyone sick of paying crazy high fees on Ethereum net when buying Million Token, is that it is now available to buy on the Polygon (Matic) network! This means fees are practically nothing which means even very small buys are now viable.
So how do you actually buy MM on Polygon?
Like many things in crypto, it seems a little complicated at first (because it is!), and small mistakes can cause big losses. So in this article I will describe how you can buy Million on Polygon. There are a few ways or variations, but this is how I did it and as they say “your mileage may vary” (YMMV). Note that this article assumes you are using MetaMask wallet (and somewhat familiar with it) and haven’t yet added Polygon/Matic network there, and you are using QuickSwap to get MM on that network.
Buy Some Matic
First you will need some Matic, which is what you will use to pay the (negligible) Polygon fees. I recommend doing that on one of the major exchanges such as Binance as it is very easy and cheap to do it there.
Besides using Matic to pay the network/transaction fees, you can also use it to actually buy MM.. may as well use Matic for both to keep it simple. So on Binance (or wherever you prefer to buy Matic), just buy enough Matic for your MM purchase, with a little extra to pay fees (including future transaction fees), and when I say “a little extra” I mean it, because it really is dirt cheap on Polygon, I’m talking pennies…
After you have purchased Matic on Binance, you will want to transfer it to your wallet (MetaMask in this example) – make sure you choose the correct network when transferring it! Binance will give you several to choose from and show the fee for each – the right one is glaringly obvious by its very low fee, but of course check the name as well “MATIC”. For example, transferring $100 worth of Matic cost 0.1 MATIC which at time of writing was worth less than 20 cents.
Add Polygon Network to MetaMask
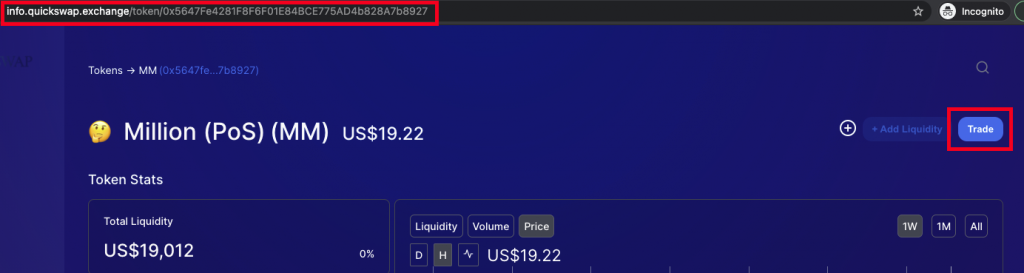
Before you do that transfer though, you will want to add Polygon network to your wallet. For your own safety, get the correct MM Polygon contract address from the official Million Token website: https://www.milliontoken.org/
Just search for that page for the “Trade Polygon” button, and click it. That will take you to QuickSwap – check that it says quickswap.exchange in the URL, and then click the Trade button at the top right corner, as shown in this image:
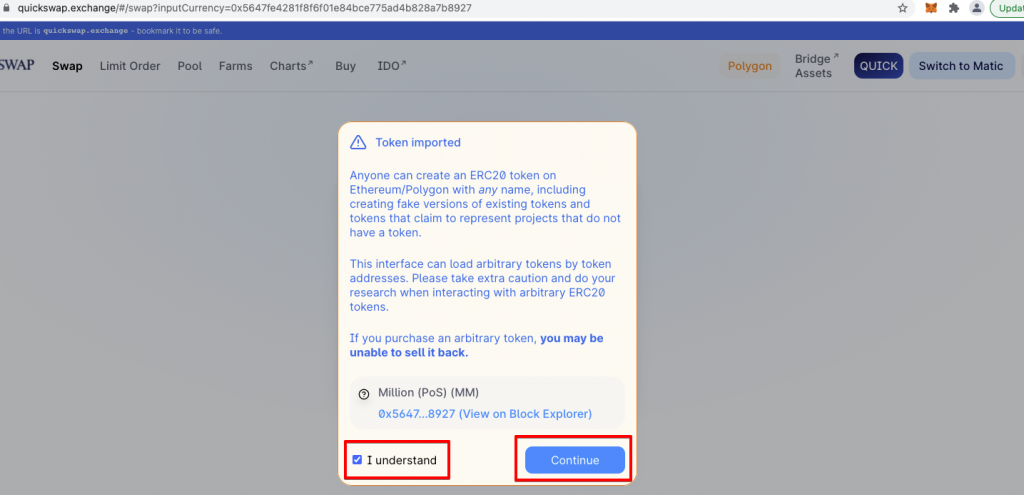
Next you will see a message about importing Million token, and a check box saying “I understand” (check that), and then a “Continue” button will appear (click that).
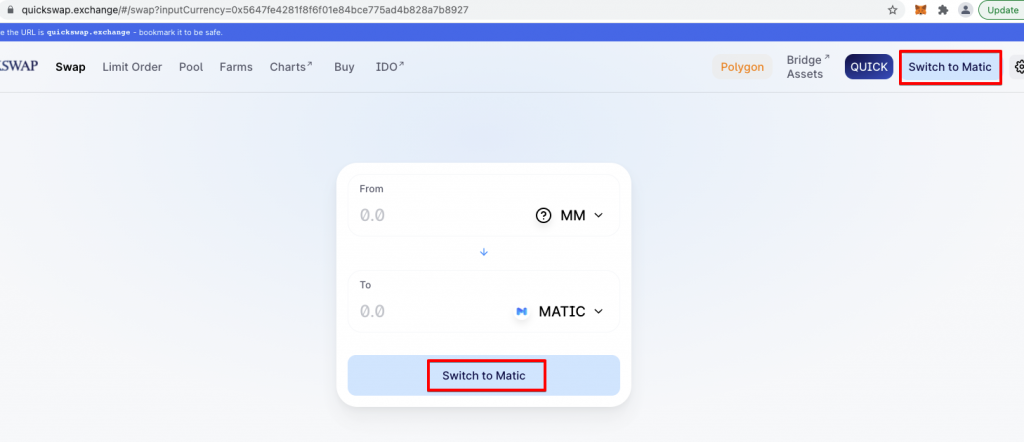
Then you will see another screen with a button in the middle saying “Switch to Matic” (same button also shows at the top right corner). Note this button only shows if you have not already added the Matic network to your MetaMask wallet, otherwise it will show “Connect Wallet” instead.
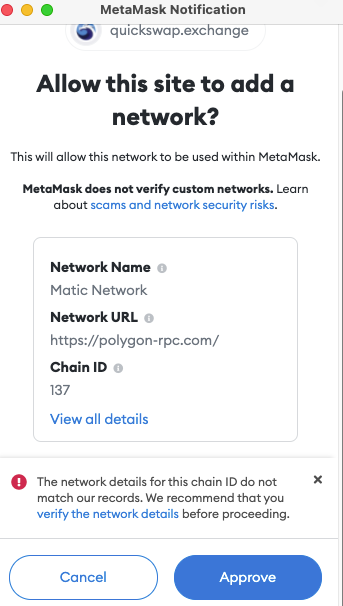
You will then see a MetaMask screen to approve adding the Polygon network to MetaMask… note that the “Network URL” may not always be the one shown in my screenshot. For example it could be https://rpc-mainnet.maticvigil.com/ which is shown on the Matic docs here. You can see a longer list of possible URLs, including the recommended one (shown in this screenshot), in the Matic network docs.
Check the details and then when you are sure all is ok, click Approve.
Your MetaMask now has the Polygon network added!
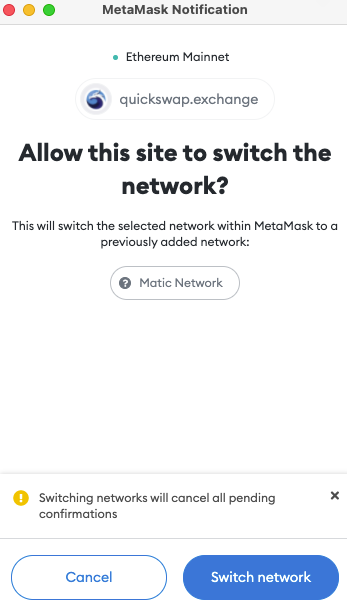
Now you will see yet another MetaMask screen asking you to allow this site (QuickSwap) to switch the network. If you are ok with that (check/verify/ensure no pending transactions/etc), then click Switch Network.
Now your MetaMask is on the Polygon/Matic network (it will show the network name at the top of MetaMask and you can switch back to Ethereum or any other network you may have added, simply by clicking the network name and selecting from the list shown), and connected to QuickSwap.
So now you’re all ready to start the fun part – buying MM on Polygon!
Buy Million Token on Polygon
To buy MM on Polygon, go back to your Binance account/app and withdraw the Matic you purchased at the start – I won’t go into the details of how to withdraw crypto from Binance to MetaMask as you’ve probably done something similar before (either with MetaMask or some other wallet and perhaps some other crypto, or even on some other exchange), and if not there are plenty of existing articles explaining how to do that.
But in brief – just click the Withdraw button on your Matic details page in Binance, paste in your MetaMask address and select the MATIC network (check, double check, triple check, that you have used the correct wallet address and the correct network otherwise say goodbye to your crypto!)
Since MATIC/Polygon network fees are so low, I highly recommend doing a test transfer first of some small amount (whatever is the minimum allowed), just to make sure it does arrive in your MetaMask wallet. Then, after you have verified that it arrived safely, transfer the rest.
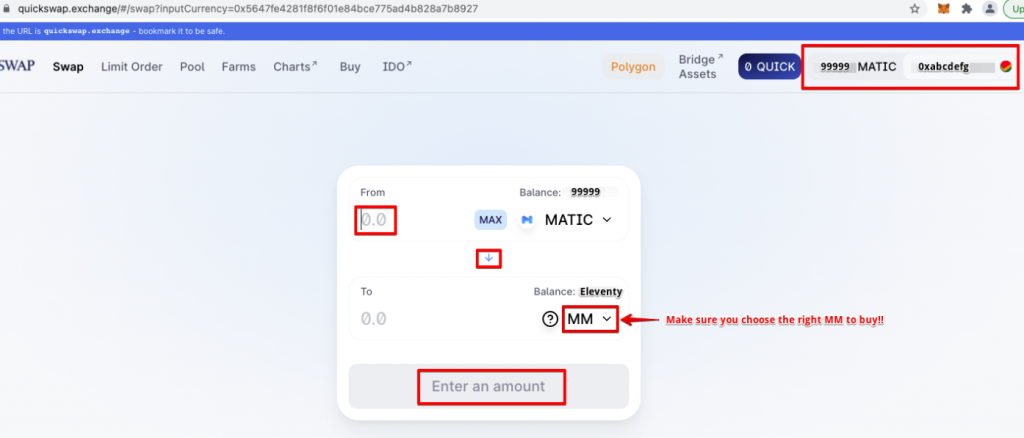
Ok, so now you have Matic safely sitting in your MetaMask wallet on the Polygon/Matic network, and you want to swap that for some shiny Million Token. Simply go back to QuickSwap, using the same button on the official Million Token website, and then click the Trade button again. You should see that your MetaMask is connected (will show in the top right corner), and the amount of Matic will appear.
In the swap form in the middle, switch to swap from Matic to MM, enter the amount of Matic (remember to leave a little for this and future transactions. You will then see the “Enter an amount” button change to a blue “Swap” button, and details of the transaction will appear, including the price and the fee. When you click that you will get another button to click to Confirm Swap, and then when you click that you will go to MetaMask and have yet another Confirm button to click… once you’ve done that the transaction will begin and you can sit back and wait for your MM’s to arrive.
As with the Binance withdrawal, I highly recommend doing a test transaction first with a tiny amount, such as $1 or even less, just to make sure it all works, before you try to swap a large amount. You should see your test transaction show up in dextools if all went well, so once you see it there, you can go ahead with the real thing.
A common saying is “trust but verify” – in crypto that’s not enough, and a better variation would be “don’t trust, so triple verify”. Make sure you are using the correct MM contract for Polygon (get from the official site), use the correct wallet address, the correct network, etc. and check every step along the way, and never ever give anyone your wallet passphrase under any circumstances.
Disclaimer: nothing in this article or blog should be taken as financial advice. I am not a financial adviser. Do your own research. Never invest what you are not prepared to lose.


