

No doubt you’ve heard of the NFT craze sweeping the world these days. You’ve heard of the insane valuations given to sometimes stupidly simple images, silly gimmicks, and sometimes even to real high quality digital art. Now you’re wondering how you too could cash in on that craze before the world moves on to some new shiny thing.
In this article I will show you how you can create an NFT, and list it for sale, and perhaps even find some buyers!
In case you actually haven’t heard of NFTs before or don’t know what an NFT actually is, it means Non-fungible Token. Surely, no further explanation is needed, right?
Ok, maybe a little more clarification is needed.. here’s Wikipedia to the rescue: “A non-fungible token (NFT) is a unique and non-interchangeable unit of data stored on a digital ledger (blockchain).”
So, now that that is cleared up, I’ll move on… but seriously, for all intents and purposes, an NFT is just something which represents a file such as an image (but often just thought of as the image itself), and verifies its authenticity. It is stored on the blockchain (like cryptocurrency) and can be created, sold and traded on platforms such as OpenSea.
Create a Collection
Most likely if you plan to create NFTs, you will want to group them into a collection. You can have multiple collections for whatever purpose, and then simply add items to that collection. The collection does not need to exist before you create an NFT, you can move NFTs to a collection afterwards.
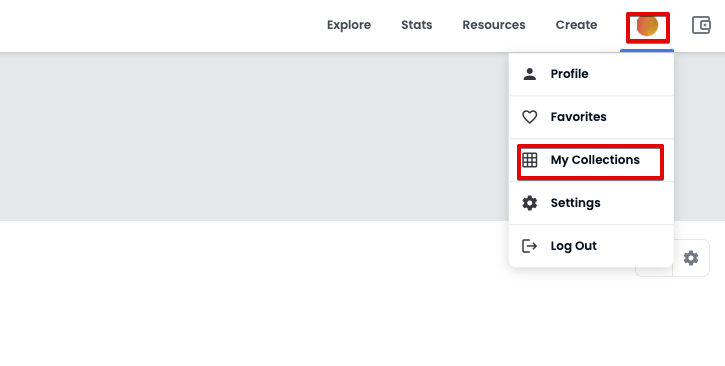
To get started, simply click your profile button at the top right of OpenSea, and in the dropdown list, select My Collections.
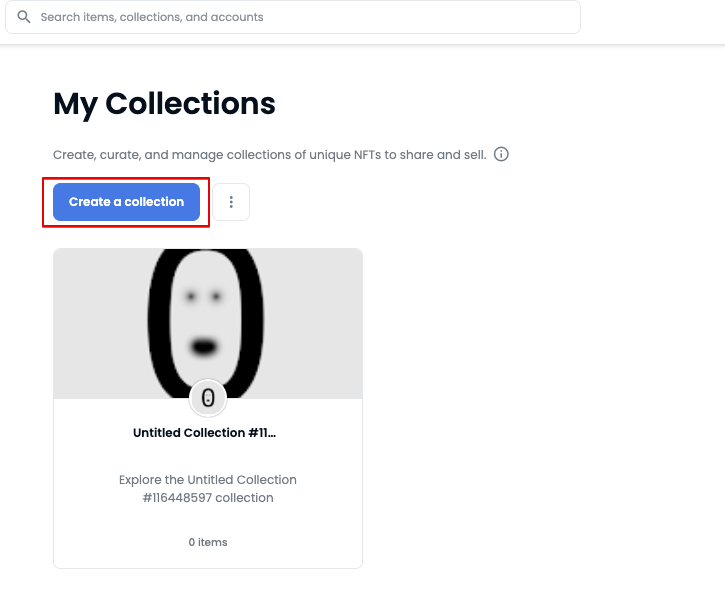
Next click on Create a collection and you will be taken to a form for you to fill in.
The Create Collection form is simple enough – just upload a logo and other images (optional), and fill in some basic details, such as name, description, relevant links (website, socials) etc. Important parts are Royalties (such as 5% to you if anyone resells one of your NFTs), the Blockchain (Polygon), what tokens you will accept for payment, and of course your wallet address so that OpenSea can send you your earnings.

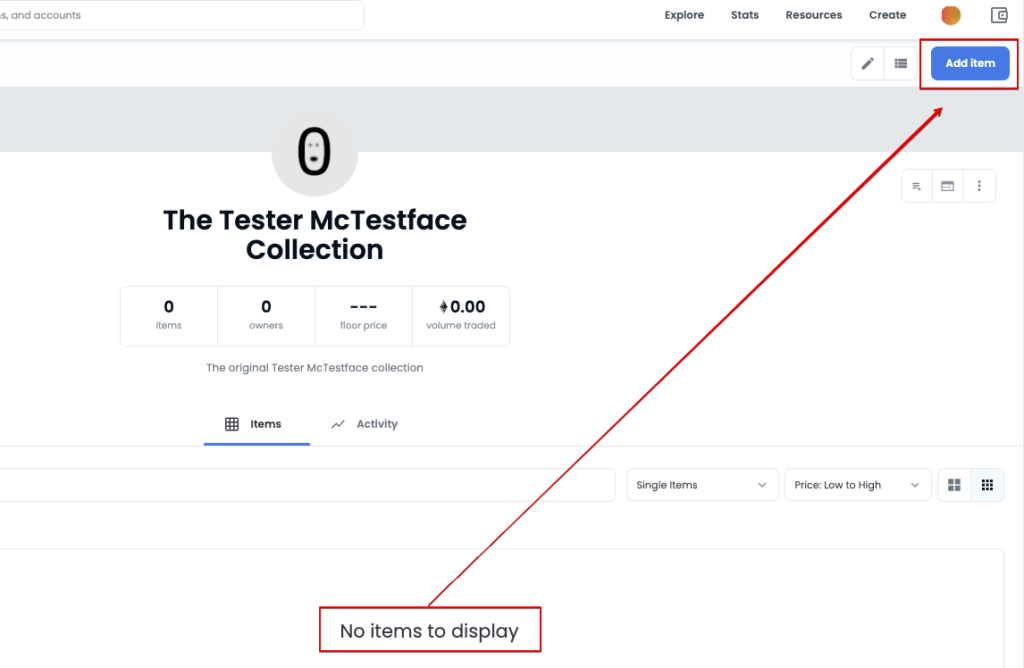
Once you have created a Collection, you can add NFTs there. Click Add item to create a new NFT in that collection, or go to an NFT you previously created, click Edit and select the Collection from the dropdown list, and Submit Changes to save. Note that it can take a while for the NFT to show up in the collection, after editing so just wait patiently and keep checking the collection page until you see it there.
Create an Image
Are you a talented photographer or gifted artist? Then you don’t need any help with this part – just do what you do. On the other hand, if you are artistically challenged like me, then you will have a couple of options you could try here…
1. Go to art college for three years to become a proper artist.
2. Make a joke image which requires little to no skills.
3. Watch a load of YouTube tutorial videos and practice every day until you can make something half decent.
I’m going to assume option 1 is not really an option right now for most people. So either make a joke image or a half decent image and take your chances.
But how do you actually make a digital image? The easiest way is just to take a photograph. Pretty much everyone these days has a rather decent digital camera in their hand every day, in the form of a smartphone. If you have a good eye, just snap some photos and pick the best one (or more) for your NFT collection.
If you want to create digital art by drawing or painting, rather than photographing, then you will need some software and possibly a stylus and tablet, although those are optional.
On a desktop computer or laptop you could use professional image manipulation software such as Photoshop, or for a free alternative, you could use GIMP, which runs on Mac, Windows, and Linux. Drawing with a mouse on a desktop machine is not so easy, unless you have a touchscreen, so I’d recommend using a tablet of some kind instead.
If you have an iPad, or even an iPhone, I recommend Procreate which is an excellent app for creating digital art. With the pocket version, you can even create high quality art on your iPhone using just your finger! Get a stylus such as the Apple pencil or Adonit Pro and you’re half way there to NFT glory.
Whichever software and device you use, learn the basics of how to use it (*hot tip* Layers are your friend) and start making your art.
If you really can’t make anything visually stunning, no matter how hard you try, then all is not lost – you can still go for the joke/gimmick picture. For example, an image which contains nothing but some text or numbers, can still be an NFT and can even sell (read on to find out how to sell such a simple thing!).
Note that an NFT doesn’t have to be a static image – you can make animations, videos, or other things… can even be physical objects.
Create an NFT
Now that you have created your work of art, you need to make it into an actual NFT on an NFT platform such as OpenSea. The process for doing this is actually very simple on OpenSea though, and requires little more than filling in a few form fields.
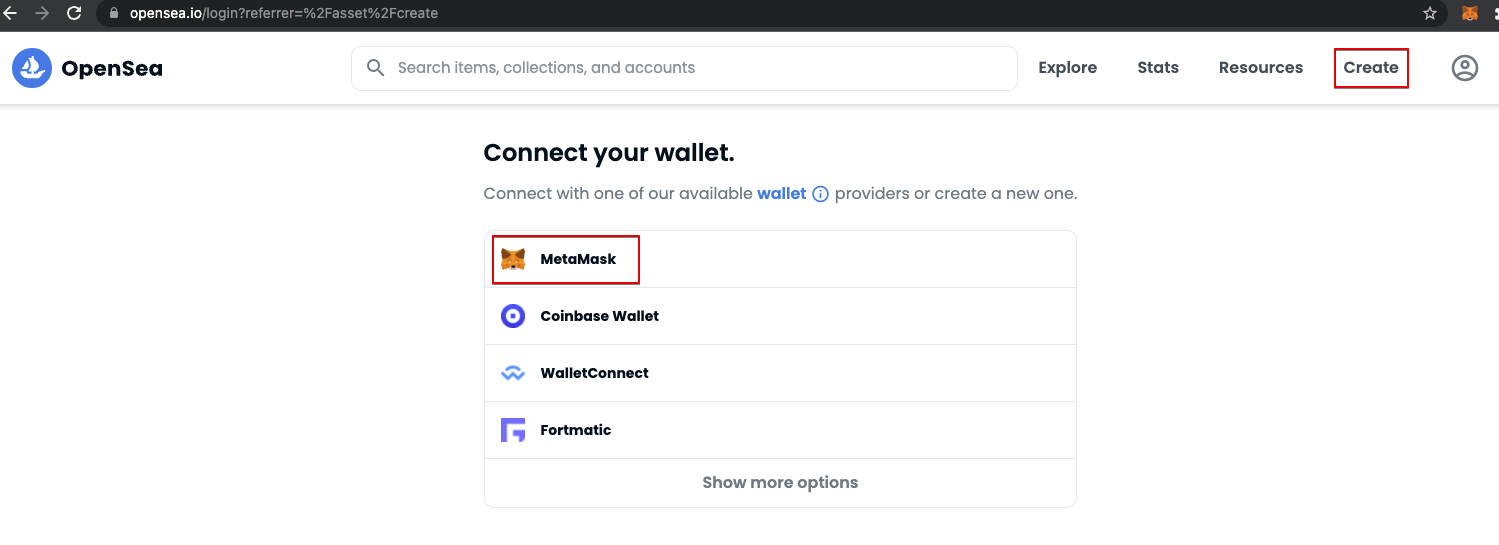
Before you can do that though, you will need a cryptocurrency wallet. A very popular choice is Metamask which is just a Chrome browser plugin, and so very simple to install. If you’re new to crypto, you could read the Beginners Cryptocurrency article on this blog.
Assuming you have MetaMask installed, just go to OpenSea and click the Create button at the top right. This will then bring up the Signature Request screen in Metamask – just click Sign there, it’s nothing to worry about on OpenSea, just proves you own the wallet. After signing, you will see the Create form.
Once your wallet is connected, click on Create at the top right corner. You will see a simple form like this:
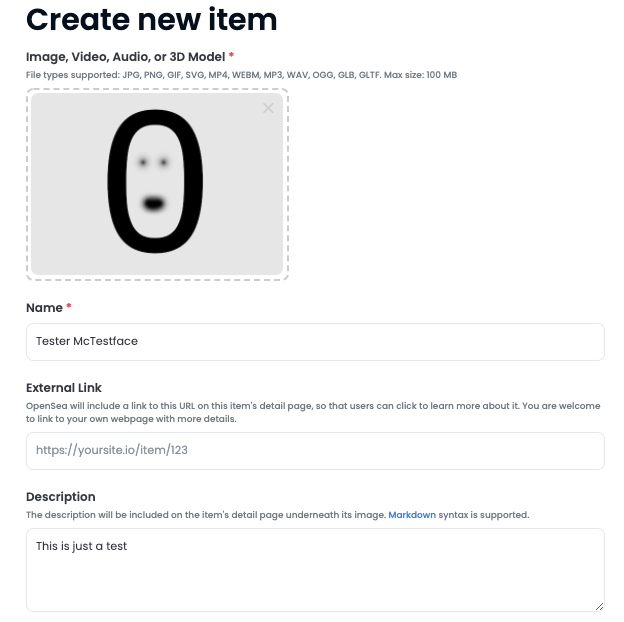
Just upload your image file, and fill in the fields shown – it’s all quite straightforward. Give your NFT a name and enter a description – be creative here as well, tell a story, make it enticing. You can also set various properties, levels, and more, but it’s optional. If you created a Collection already, you can select that here, or you can create one later and move it there – the Collection is optional, but it’s useful if you plan to create more than one or want to keep some NFTs separate from others.
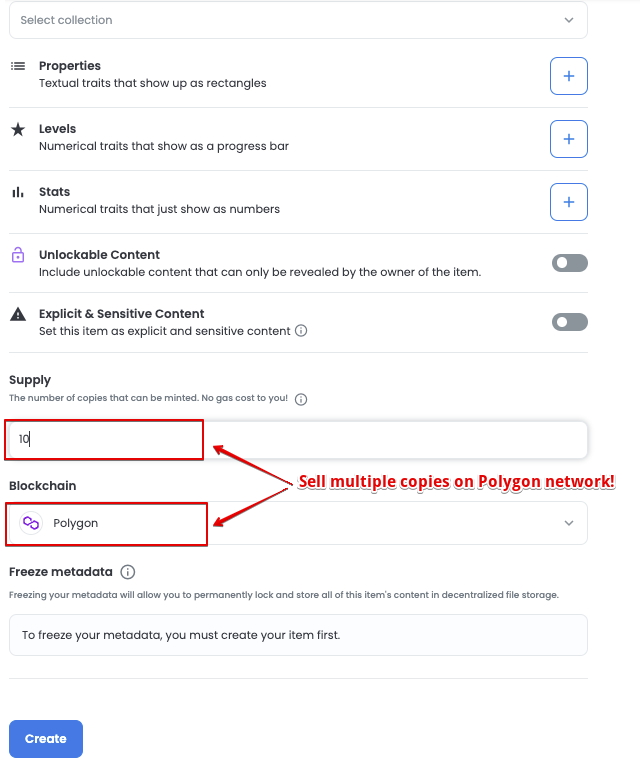
Important to keep fees low (free for you) and sell multiple copies, make sure to choose Polygon for the Blockchain field and then whatever number you want to sell in the Supply field.
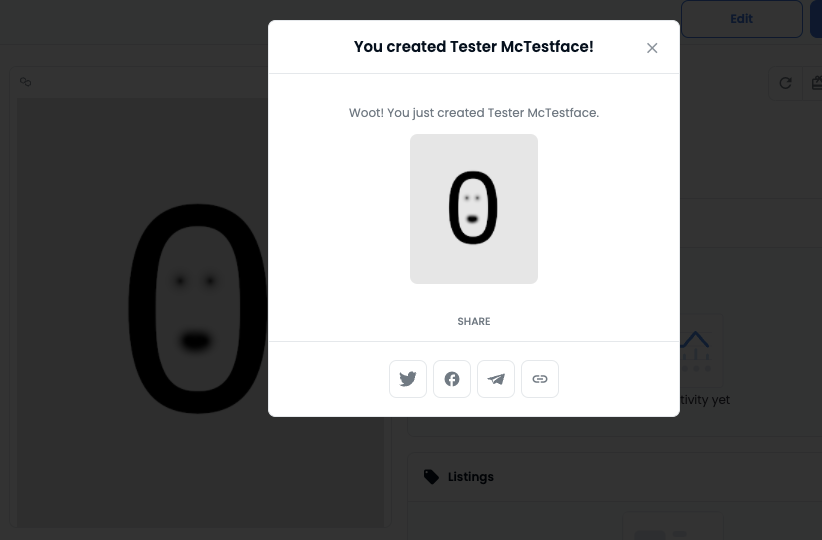
Once you’re happy with the info you’ve entered, click Create and you’ve created your first NFT!
List the NFT
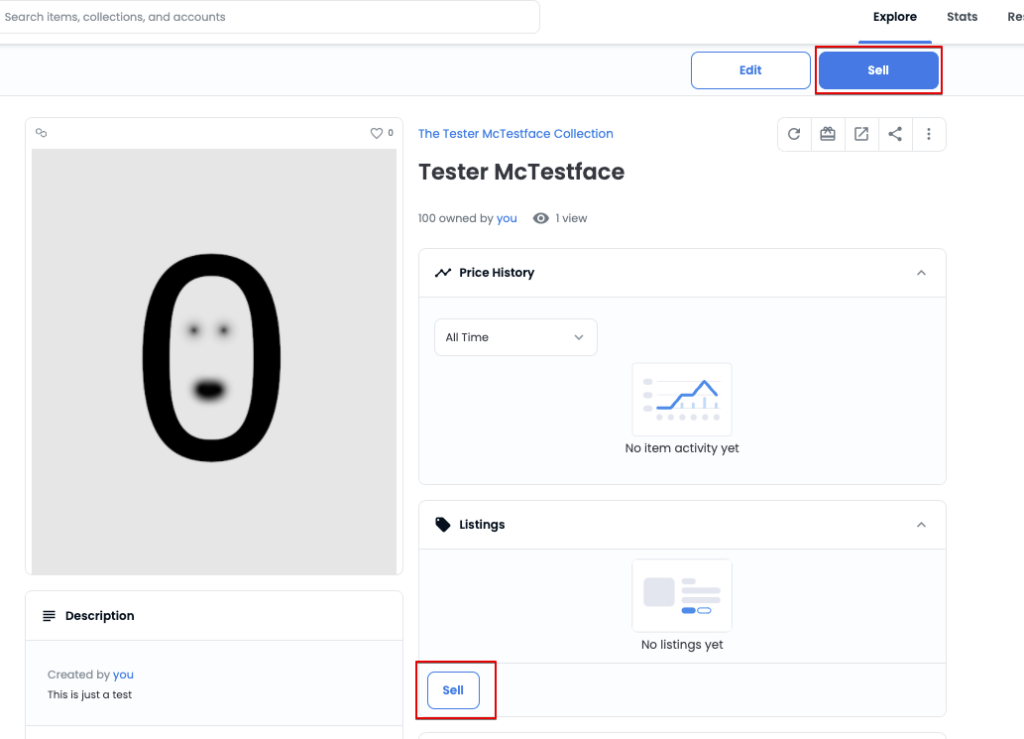
Things are looking good, you’ve created an NFT, and a Collection, and you’ve added your NFT to the Collection. So now you will probably want to list your NFT for sale so you can make the big money. Just go to your NFT page, and click the Sell button (there are probably two Sell buttons).
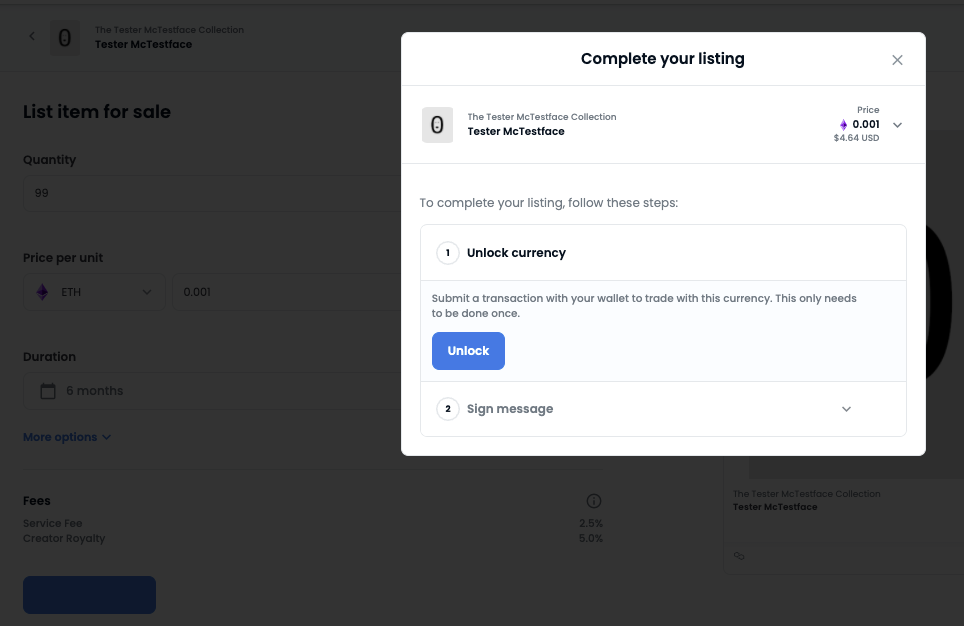
Decide how many you want to sell. If you created a supply of for example 100, and you want to sell ALL of them, then enter 100 in the Quantity field, or if you want to keep one for yourself, enter 99 there or whatever else makes sense to you. Next enter a price in ETH or whichever currency you enabled for your collection. Once you are happy with the settings, click Complete Listing.
Now you may have to do two steps with your connected wallet – Unlock currency and Sign message. This won’t cost you anything on OpenSea and is standard procedure, so just follow the prompts.
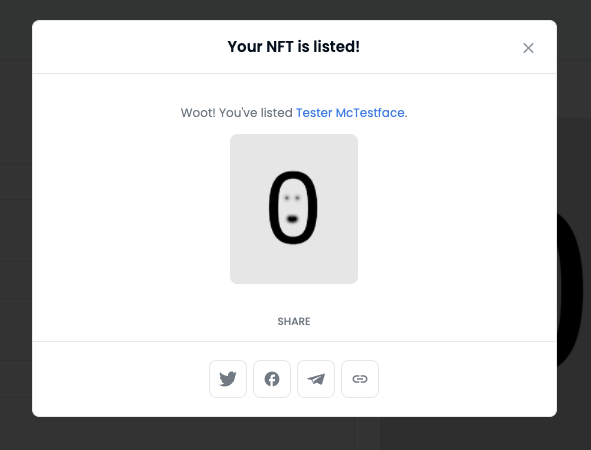
Once you’ve signed, your NFT is listed for sale on OpenSea!
Promote Your NFT
“Build it and they will come” they say… but in reality, what often happens is nobody shows up. Just building is rarely enough, you need to get the word out somehow, get some attention for your NFT collection from potential buyers.
A common tactic is to build a community around or related to your collection. Do this across multiple platforms such as Twitter, Discord, Reddit, Facebook/Meta, or wherever else you can reach people in your target audience. This of course takes time to do, so you may want to start building the community ahead of time in preparation for your NFT launch. Or launch first and then start building the community, it doesn’t really matter.. either takes time and effort, but can pay off dramatically in the long run.
You should follow/like/share relevant content and people (including influencers) on your chosen platforms, to get attention and acquire new followers of your own. Create a Discord and/or Telegram group for your future NFT buyers to get together.
As mentioned, building a community takes time and effort. However, there’s already millions of communities out there, and there’s a good chance you can find one (or many) that are relevant to your target market. When you find those, join them, participate and then you can piggyback on those communities to promote your art – not by spamming though! Do it smarter, not stupider!
A good example is Lionrun.io – an NFT metaverse project built around the Million Token. They are an active community that loves creating and sharing original art NFTs which are related in some way to the community such as in-jokes, memes, and naturally anything to do with Lions and Million token, and they have regular NFT airdrops!
If you have some money to spare, you can list on Nftcalendar, NFT Evening and others.. if you’re lucky you may even get listed free on some of them.
If your NFT has multiple copies, or you have multiple NFTs in your collection, you may consider gifting one or more to other OpenSea users, other NFT artists for example, or those that are known to buy NFTs similar to your own. There’s no guarantee they will notice it (OpenSea often puts them in their “Hidden” tab), but it may get you some attention and goodwill.
You’re of course welcome to checkout the amazing Tester McTestface collection used in this article – you can even buy one! (although such amazing art may sell out fast 😉 )
Have you published any NFTs yet? Got any tips on creating and promoting NFTs? Feel free to share!
Leave a Reply